In (hopefully) continuing tradition, here’s a postmortem for my JS13k 2019 entry, Xycore!
Fair warning though, I’m writing this well over two weeks since touching the majority of the code, so I might have forgotten some things, or misremembered some things. I also wrote this over the period of a week - it’s likely to come across as a bit disjointed or random. You have been warned.
Feel free to hit me up on Twitter if you want some specific information on a feature that I glossed over or forgot to mention.
Fun fact: I practically reworked my blog’s theme from the ground up during the course of writing this, to add useful features (Such as a fancybox gallery), a dark theme, proper code highlighting, some stylization of headings, a table of contents and a bunch of small style adjustments.
The theme I’m using is
pelican-twitchy, but I’ve changed nearly everything at this point. The only thing I’ve left alone is the sidebar (Mostly).
This fancy Table of Contents will let you jump to any major heading, and if you want to quickly return to it, there’s a fancy little “Back to Top” button at the bottom right of the page.
- Xycore: An overview
- The original idea
- Art Style Limitations
- Initial Design Decisions
- A note on my design process
- The Code
- My Tools
- Level Data Storage
- The Canvas
- Code Organization
- Development Process
Xycore: An overview
So first up, let’s talk about the finished product! In case you need it for reference or to give it a play, here’s the link.
Xycore is a throwback to a specific genre of games, drawing a lot of inspiration from Daniel Remar’s Hero Core and classic Metroid.
You’ve landed on an alien planet at a secret weapons facility, with a mission to destroy the Super Reactor at the core of the facility. The core is sealed by the power of four guardians, and you must destroy them to complete your objective.
The game features four bosses, four weapon upgrades and a variety of hidden power-ups to help make the game easier. I also managed to fit in a few out-of-scope features that I feel add a lot to the style of the game - namely a fancy raster water effect, basic oscillator sounds and a bit of juice (Screenshake! Lerp! Sometimes!)
The original idea
When the 13th of August rolled around, I had a completely different game in mind. In fact, it was less a game and more a fantasy console I was going to call “Mini13”.
I had already spent a few days early in August tinkering with a really tight bytecode processor that could do basic operations on the canvas and map input, and the plan was to release this little “Console” with a pack-in game of Breakout or something along those lines.
And for at least a few days I tinkered with the concept. It was essentially a ‘CPU’ made up of complex opcodes that, instead of mapping to super low-level operations would instead map to more complicated JS API operations. Here’s a simplified pseudocode example:
let code = [];

// "Opcodes" are stored in 8-bit binary format, each code taking
// two bytes, and potential extra bytes depending on required
// parameters - this is handled by the opcode handlers

fetch(`some_local_file.bin`)
    .then(res => res.arrayBuffer())
    .then(buffer => { code = buffer });

let flags = {
    zero : false,
    overflow: false,
    truth: false
};

// Program Counter
let pc = 0;

// Registers are not fixed, just a dumb array
let registers = [];

// The ops the CPU can do are mapped to an array of functions
let ops = [
    // No Op
    () => pc + 2, // Return the next instruction location

    // Cmp -- R Imm -- Takes a register index and an immediate
    () => {
        let r = GetInt16(pc+2);
        let i = GetInt16(pc+4);
        let t = registers[r] - i;
        flags.zero = t === 0;
        flags.truth = t === 0;
        return pc + 6; // Most values are 16-bit, aside from addresses
    },

    // Je -- Imm32 -- Jump to address if Equal
    () => {
        let addr = GetInt32(pc+2);
        if(flags.truth) {
            return addr;
        } else {
            return pc+6;
        }
    },

    // DIMG -- R(idex) R(x) R(y)
    // Draw image from global spritesheet to context
    // An example of a 'complex' instruction
    () => {
        let idex = registers[GetInt16(pc+2)];
        let x = registers[GetInt16(pc+4)];
        let y = registers[GetInt16(pc+6)];

        DrawSprite(idex, x, y);
        // My actual solution for sprites was to use something similar to
        // the OAM Table in the NES/Famicom - a fixed array of sprite objects
        // that get automatically drawn if active, with fixed properties
        // like X,Y coordinates, Width and Height in spritesheet tiles and
        // any attributes (Like whether it's flipped or rotated or not)
        // But this is just a really rough example.

        return pc+8;
    }
];
I got up to the point where I had a bunch of pixels filling the screen based on some code, but I realized that at some point I was going to have to write an assembler or I’d be entering opcodes manually for the duration of the competition, and I wasn’t really up for that.
So I cleared out the project folder, opened up Aseprite with a palette I had created for the competition, and set out to make a ‘complete’ set of art to work with. After a bit of scribbling around, I came up with an initial sprite set (Click to enlarge)
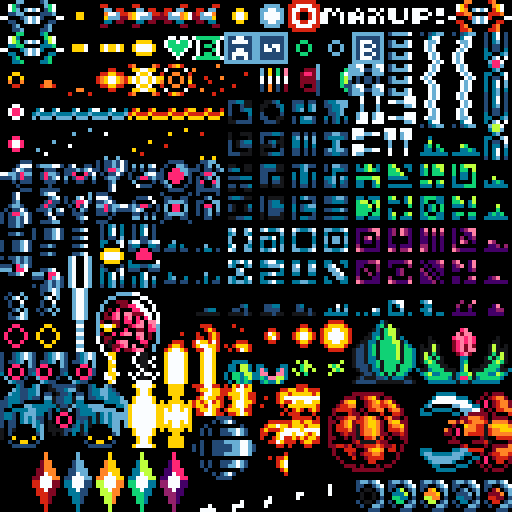
Most of it was random doodling, but I thought that it would serve as a good basis for creating something to begin with.
So with that I began.
Art Style Limitations
From the moment I started doodling in Aseprite I had a certain set of limits in mind. The “Fantasy Console” I was originally planning had a custom 16-color palette, and I decided to keep that and work with it.

I sacrificed the 16th color for transparency, allowing me to utilize the natural compression you get for free with 16-color PNG images.
I also find that working with a limited palette accelerates my workflow, as I have fewer overall design decisions to make and can’t really mess around with hue and value too much.
The initial spritesheet fell in at just under 5K without any compression, which I considered good enough - my goal was to use approximately half of the available space for art, the other half for code.
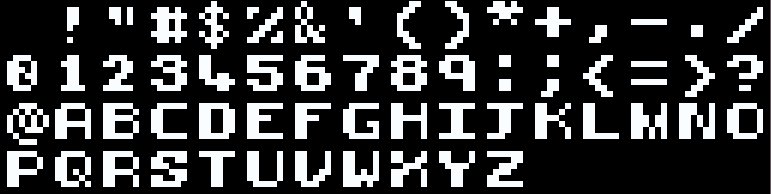
I also created a font sheet to go with the game, but cut it out a couple of weeks into development because I didn’t really need it. Here it is for reference!
Initial Design Decisions
After seeing the theme, Back, and after throwing out my Fantasy Console concept, I ended up deciding on two key aspects or uses of the word “Back”: First as the “back” in “throwback”, and then as the “back” in “backtrack”.
My initial spritesheet also helped inform this concept, since I had a few nods to some classics in the art - and if I was going to do a game inspired by Metroid and Hero Core, I was going to end up with some natural backtracking to find new bosses, powerups and areas!
Much later on I also added in the classic “Escape the self-destructing planet” sequence, and that adds in a “Get back to your ship” use of the word.
I mostly ignored any further potential theme tie-ins: I really wanted to focus on a good core gameplay experience first, and adding in gimmicks might have hurt development time, cost and gameplay.
Before beginning any actual coding, I played a bit of Hero Core again to better remember what it had going for it, and wrote down some notes on how I wanted my bosses to behave.
A note on my design process
I’ll be honest up-front and state for the record that I’m a bit of a lazy designer. I don’t write design docs. I sort of grow them instead, adding and removing bits and pieces as I see the need for them and generally repeatedly asking myself “What next?” from a player’s point of view.
I guess you could represent this design methodology as a flowchart, but that would get cumbersome. Instead, I use good old Emacs, and the magic of Org Mode.

Org Mode is one of many major modes that can be added to Emacs. It provides a very simple way to create interactive informational documents in a similar fashion to Markdown, except that it comes with some built in conveniences (Such as collapsing headings into folding bullets, highlighting keywords, a timestamping/timesheet feature, a full agenda mode for scheduling and too many other features that I haven’t even considered using yet).
The file itself is a very simple ASCII document that looks something like this:
DEV TODO:
=========

* DONE ENVIRONMENT PROGRAMMING -
** TODO + Create subtle shifted tint for distorted area in Fire Zone
** TODO + Create some plants/decor to be randomly placed in each area
* THINGS REQUIRED -
** DONE Mini-Core -
    Extra descriptions, code or anything can go here and be folded out of the way.
In my configuration I just hit TAB to fold a region, so I can quickly add notes or even subtrees to a section and quickly jump around, add more notes, refine things, strike through cancelled features, etc.
I’m using my own notation here for a lot of stuff, like the “TODO +” entries basically meaning “For Version +1”. Prioritization is something I could have used too, but didn’t really feel the need to for this project.
This document started from very humble beginnings, something along the lines of:
DEV TODO:
=========

* REQUIRED -
** Get player sprite moving on screen
And it grew from there - I went through my spritesheet and added a feature in the document for each ‘object’, and wrote a little note on what it would do or be used for. If I couldn’t think of something to use it for or thought it would be too time consuming or space consuming for the game, I cut it from the feature list and continued.
This ended up giving me a pretty solid foundation to work with, and a list of things to do whenever I was at a loss.
The Code
If you want to follow along with any of the code, the source is up on GitHub
All of the game’s code resides in main.js, with the only dependency being sprsheet4.png.
The other files are various dependencies:
| Filename | Purpose |
|---|---|
| compiled.js | Build artifact from Closure compiler, left in as an example |
| compress.bat | Lazy batch file to run the Closure compiler and pipe the output into index1.html |
| index.html | My ‘development’ html file. |
| index_template.html | The first piece of the distributed HTML |
| index_end.html | The tail-end of the distributed HTML. In hindsight, could’ve just piped a fixed value into the final HTML file |
Other files are part of the JS13k submission system.
Once built, the only files that need packing are index1.html (Renamed to index.html for the js13k submission) and
sprsheet4.png.
For compression, I made use of 7zip to create the ZIP file, then further compressed down with advzip and optipng.
The exact commands I used are as follows:
optipng -o7 -zm1-9 sprsheet4.png
advzip -z -4 -i 5000 dist.zip
My Tools
Tool choice is pretty important for JS13k. You need to be comfortable with what you’re using, and it’s a good idea to have some ‘quality of life’ extras.
My development environment is Windows, with three alternative ways to use Linux for any Linux-specific tools or conveniences (Those being a VM server, WSL (Though that’s a buggy mess 50% of the time) and a physical laptop that I often just leave on a shelf and run a low-profile server, accessed via SSH).
My editor is Visual Studio Code for code editing, Emacs for organization (org-mode is amazing).
VS Code has some strong benefits for me: Remote Workspaces being one of them, a feature I make use of frequently, and the built in debug interface is crucial to smooth game debugging.
Sure you can set breakpoints and such up in the Firefox/Chrome dev-tools, but VS Code’s debugger will auto-focus on a breakpoint or exception, show a nice list of locals, the call stack and has extra types of breakpoint.
Logpoints and conditional breakpoints are something you never knew you needed until you try them.
I’m still lazy and tend to automatically use console.log() in my code without thinking, but logpoints
are a lot cleaner and come with the benefit of not needing to tidy up your cascade of console.logs after
a gruelling debug session.
Mid-competition there was an update to VS code that added Data Breakpoints - breakpoints that fire when a specific variables changes. All of these debugging tools together help to minimize the amount of hunting you have to do for weird bugs, and allow you to catch issues earlier.
For art I tend to always use Aseprite for my pixel art, ClipStudio PAINT for quick concept sketches or a good old piece of paper and a pencil - I always have a few pencils at hand, and a clipboard with some cheap printer paper for doodles or notes!
My build tools consisted of nothing but browser-sync - hot reloading is invaluable when you’re doing rapid iteration! My last js13k attempt involved a somewhat complicated Gulp and Webpack setup, but since I decided to work in a monolithic file - a bad idea, I know, but I managed! - I decided to rather take the path of least resistance and manually compile my game later.
Level Data Storage
Early on I made a decision to store my levels as image data. I’d done this for my previous JS13k entry, and it was fairly successful if a bit cumbersome. But it compresses way better than an inline array, and didn’t require too much code to get working. There was one caveat that I’ll bring up later, but suffice it to say that it works.
The map looks like this in its current form:
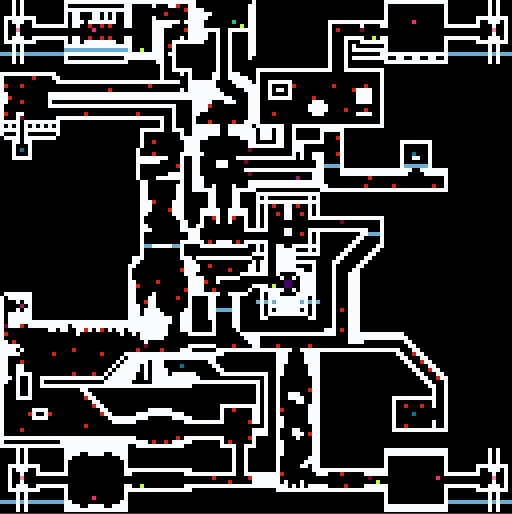
The way this works is that in the game’s code I have an array of 16 RGB values, each one representing a color in my palette. I read the map image in, copy it to an ImageData buffer and read each pixel in the map, comparing it to the palette and pushing the returned palette index into a map[] array.
Each palette index has a ‘meaning’ to the game: White is walls, transparent (Black areas in this screenshot) is empty space, the one shade of red is enemies, another bosses, dark red doors, etc.
Eventually I merged the spritesheet and map into a single file to help reduce ZIP file overhead.
In hindsight, I could’ve implemented a really simple in-game map using this! Just render a piece of the map based on where the player’s screen coordinates are, and only render doors and walls. That said, I didn’t really have much screen space to work with, given my next limitation.
The Canvas
As a sort of holdover from the original Fantasy Console idea, I decided to limit my canvas resolution to 128x128 pixels. This not only meant I didn’t have to worry about performance as much, but meant I didn’t need large sprites to provide a decently “busy” looking game world.
This also made map editing easier, since each 16x16 grid cell in Aseprite corresponds with a single room.
In index.html there’s a bit of inline css to position the canvas on-screen as part of page layout, instead of trying to fiddle with it from the JavaScript side,
as well as enable “Crisp Scaling” on the canvas so that the pixel art looked sharp.
Here it is in expanded form:
<style>
    body {
        /* This sets up a nice uniform area to put the canvas
            in and 'letterboxes' the sides */
        display: block;
        margin: 0;
        background: black;
    }

    canvas {
        display: block;
        height: 100%;
        margin: auto auto;
        image-rendering: pixelated;
        image-rendering: crisp-edges;
    }
</style>
<canvas width="128" height="128"></canvas>
I decided right at the beginning that this DOM configuration was vital to the game’s presentation. I demand crispy pixels and proper framing!
Code Organization
Brace yourself, main.js contains the entire game. It’s somewhere between 1000-1500 lines of actual code.
Before submitting I went over it and tried to comment things as I remembered their purpose, so there is some useful commentary, but there’s a lot of weird code, some areas where I tried some silly things and even entire sections of dead code. Not too many, but they’re there.
Now as for why everything is in one giant source file, it’s because I was feeling somewhat lazy this year and didn’t feel like setting up a bundler this year. For JS13k 2017 I used an overcomplicated build setup involving Webpack and Gulp. Next year, I’m likely to try getting a Parcel workflow working - Parcel is my go-to for any other web projects I work on, but this year laziness won out.
I did divide the source into four distinct areas: Global variable declarations, Function declarations, Initialization and Game Loop.
Normally writing everything in one giant file like this would prove a major headache, but I make pretty heavy use of a Bookmark extension for VS Code that lets me keep things in relative order. That said, having some things in their own separate files would’ve made things a lot easier in the long run. But I knew what I was signing myself up for!
Development Process
The first thing I did once my spritesheet was created was get the player sprite onto the screen and rendered. The second thing I did was to implement a better general-purpose sprite drawing function that could rotate and scale sprites - I used this to flip and rotate sprites, which allowed a lot of sprite reuse later on.
I also created a function to create sprite objects that contained the relevant data for a sprite’s frames and size, with defaults. This is what it looks like (with formatting):
let SpriteID = (frames, width=8, height=8) => {
    return { frames, numframes: frames.length, width, height };
}
From there, I went on and created a separate function for drawing tiles. The tile function takes an array of indexes into the spritesheet, and chooses the subtile to use based on a combination of the X and Y position the tile is drawn. This gives a bit of pseudorandom variation to the tiles.
Game Progression
After I had something moving around on my screen and a few rooms to move around in, I started thinking about what I’d like to make with this.
I decided to keep player mechanics as simple as possible: Free-movement with a ‘shoot’ button. This meant I could immediately shift focus to the environment.
The first thing I did was split the map into five distinct areas. Each of the four quadrants of the map make up an area, with the tiles that meet in the center being “Area 0”.
It was around this time that, one evening, I started tinkering with some raster effects and created the water effect that’s found in the game.

My first solution to achieve this involved drawing a copy of the canvas into an ImageData buffer. This is the original code:
let ibuffer = context.getImageData(...canvasDimensions);
for(let row = distrow; row < 128; row++) {
    let p = distortion ? round(Math.sin(sintimer*2+row*1280)) : 0;
    let ap = abs(p); // Really redundant
    for(let i = 0; i < 128-ap; i++) {
        let idex = (row*512)+(i*4); // Get offset into buffer. Same as y*(width*4) + (x*4)
        for(let j = 0; j < 3; j++) {
            ibuffer.data[idex+j] = ibuffer.data[idex+ap+j];
        }
        ibuffer.data[idex+3] = 0xFF; // Set alpha to full value
    }
}

// My screenshake was also baked into this area of the code.
// msin and mcos are defined just before the loop, based on global sintimer.

context.putImageData(ibuffer,
    // I use ternary expressions a lot.
    screenShake * globalclock % 2 == 0
        ? msin*screenShake*-1
        : msin*screenShake*1,

    screenShake * globalclock % 2 == 0
        ? mcos*screenShake*-1
        :mcos*screenShake*1)
Later on I discovered that this was a serious performance bottleneck: Context.getImageData() is just too slow.
So I created a faster solution that uses a buffer canvas and redraws slices of the main canvas to an offset. That looks something like this:
// cbuffercontext is a "copy buffer" defined near the top of the file next to the primary
// canvas/context. Here we're clearing and copying the contents of the primary buffer to it.

cbuffercontext.clearRect(...canvasDimensions);
cbufferContext.drawImage(canvas, 0, 0);

// In case you're wondering, distrow is the row on-screen where the water effec starts,
// defaulting to 0 (Whole screen). This is used to render partial water in some rooms
// without too much special logic.

for(let row = distrow; row < 128; row++) {
    let p = distortion ? round(Math.sin(sintimer*2+row*1280)) : 0;

    // Clear a line of the buffer

    cbuffercontext.clearRect(0,row,128,1);

    // Draw an offset slice.
    // We only ever draw at 0 or -1, otherwise the effect is too pronounced

    cbuffercontext.drawImage(canvas, 0, row, 128, 1, p > 0 ? 0 : -1, row, 128, 1);
}

// Copy the copy-buffer back to the main canvas
// We clear the main canvas first, since black pixels are actually just transparent pixels.
context.clearRect(...canvasDimensions);

// xoff and yoff are the screenshake offsets in this version
context.drawImage(cbuffer,xoff-1,yoff);
At first I thought this would be a colossal waste of space, but it really grew on me, and I think it adds a lot of visual style to the game - so I kept it!
A bit of “Juice”
While I was testing my game, I noticed that there was a lack of impact. Something should happen when a bullet hits something, or when the player takes damage. Something other than the sprite flickering or a dispersion effect spawning.
I added a really simple screen shake system that shakes more and longer the higher the variable that controls the shaking is. I added it to everything I could think of, and it definitely made the game feel punchier almost immediately.
The code for this is somewhat simplistic and also not entirely well implemented: The amplitude of the shake is a function of the duration of the shake. I have no idea what my thought process behind this was, but it means that a higher duration screenshake shakes the screen to a stupid degree.
The code that does this is as follows (From Line 1705 in the source)
let msin = Math.sin(sintimer*2)*2, // Simple sine and cosine values for variaton
    mcos = Math.cos(sintimer*2)*2,
    // Screenshake calculations - scales the screenshake timer by the given
    // sine/cosine value and then again by the direction.
    xoff = screenShake?screenShake*globalclock%2==0?msin*screenShake*-1:msin*screenShake*1:0,
    yoff = screenShake?screenShake*globalclock%2==0?mcos*screenShake*-1:mcos*screenShake*1:0
If you feel like playing around with this and seeing how bad high screenshake values can really get, try modifying the screenshake value for something silly like bullet impacts to something like 32 and watch the world shake itself apart!
The Bosses
The “Magma Centipede” boss
After I created my four visual areas I decided I wanted to create four bosses based on the sprites I’d already made. I began with the most difficult one, the Magma Centipede/Worm.
Before creating the player code I had already experimented with creating a segmented enemy that drew multiple body parts as a ‘line’ of segments. With a bit of tweaking I managed to get it to wriggle menacingly from the right-hand-side of the screen.
In steps, I added more ‘life’ to it, beginning with the ability to damage the player if touching. Then I made it take damage from the player’s weapon.
And at that point I decided I wanted a simple state machine. My implementation for all four bosses involves a large switch statement that checks a variable named bossPhase. The currently spawned boss has a data object that contains some common boss variables as well as some unique values, e.g.: the fire boss has a segs variable to represent the number of segments remaining.
From this point I started scripting the boss stage by stage. The first thing I made it do was appear from off-screen. This was a simple check against a variable holding the X value. Once it hit that value, it’s off to the next ‘phase’ of the behavior.
Next I made it quickly disappear off screen when you took out one of its health bars, and return again with one a segment removed.
Then I decided to mess around and made the fire-wave. That was a lot of fun to make, but is also some of the messiest code in the file! It’s basically a super-long array of X and Y coordinates, and the boss loops through each of them decrementing the X value and assigning the Y value as a function of a sinewave based on that X value.
It was around this point that I gave the Closure compiler a try, and was pleasantly surprised when I found that I was only using 7.5k or so. I realized that with a bit of work I could add some interesting behaviors to my bosses, and make them a centerpiece for the game.
The “Venus Flytrap” boss
The next boss I tackled was the Unnamed Plant Boss/Venus Flytrap. I had already decided a few days before implementing this one that I wanted it to be a ‘simple’ dodge phase, defense phase and damage phase: Dodge the bullet pods, destroy the vines, attack the center, repeat for another two waves. I was planning on saving the more ‘complex’ behaviors for the last boss.
A key addition to my implementation here was the creation of a playerHurt function that enemies an bosses could call to damage the player, as well as a playerProjectileTest function that would loop through the active player projectiles and apply a basic AABB test to them, running a callback if a collision was happening.
The damage the vines inflict was implemented using a manual AABB test against the player coordinates, and would ‘bump’ the player to the left or right depending on which side of the screen they were on.
The final phase is the “free damage” state: You have as much time as you want to spam bullets at the plant bulb and get rid of an HP bar.
The “Mother Brain” boss
This boss was a pretty simple one too, because I was getting nervous as I crept closer to the 10k mark, and I wanted space to add extra enemies, weapon powerups and suit upgrades
Up to this point the weapon upgrades were automatically granted as soon as you destroyed a boss. This worked, but having an actual item to pick up after the boss room feels much more rewarding.
Similarly to the Flytrap, I decided to have some sort of barrier to take down, so I started with a nod to the barriers in the original Metroid game when fighting Mother Brain.
But barriers alone made for a boring and completely benign boss battle, so I “temporarily” added in a bunch of enemy spawners along the top and bottom of the central corridor.
I decided to keep them, in the end, they added a somewhat random element to the boss, since anything could technically spawn.
After taking down the first HP bar, the brain spawns in four turrets with projectiles that fire towards the player’s position. This adds a bit of required dodging, but isn’t too hard to get through. Originally I was going to spawn another wave of these, but I decided not to in the final game because this was going to be the first battle the player would have.
The “Tank” Boss
I took on this boss pretty close to the end of development, after I’d already added in a bunch of things like the health and suit upgrades, so I decided to go “all out” with it.
Initially I just did slow linear movement from side-to-side, but I decided that didn’t have enough impact. So I went and added a simple lerp and quadratic easing function to the game. Still not feeling the impact enough, I added screenshake every time the boss ‘stopped’. This added a bit of punch to the fight.
The drop-down from the ceiling was intended to give the player a window of opportunity to mash the fire button at the boss for a bit, but not for free - it was a bit too easy, so I added a wave of those tracking projectiles to this portion of the fight.
Originally the fight drastically sped up as you got through the health bars, but I toned it down a bit. Even I was having trouble getting through it, and I made the game!
On that note, it is possible to defeat this boss without any weapon, suit or health upgrades. While debugging I did that several times, though it’s pretty tough.
During normal gameplay you can’t encounter the boss without the third weapon upgrade, but you can intentionally downgrade using the JS console by entering
playerWeapon = 0, if you’d like to challenge yourself - but only if running the unobfuscated version of the game. I have no idea what the variable name is once it’s minified!
An Audio Experiment
At some point during week 2 I had this harebrained notion to add sound to my game. I had already firmly decided at the start of the competition that I knew nothing about the Browser Audio APIs and that it’d be best left until next time.
My brain beyond 11PM doesn’t care for my resolve. I cracked open MDN’s docs on the API, picked out the squarewave oscillator and created a really simple sound player.
It consists of three parts: An oscillator node, a gain node and a function that feeds the oscillator.
The beep function takes as its argument an array of arrays. Each sub-array needs two values: A frequency and a duration.
The function recursively consumes the array until done, setting the gain to a non-ear-destroying level upon starting a new note and setting it back to zero when ending a note.
Here’s the entirety of the audio code:
let ac = new AudioContext;
let osc = ac.createOscillator()
let gain = ac.createGain()
osc.type = 'square';
osc.connect(gain);
gain.gain.value = 0.0;
osc.start();
gain.connect(ac.destination);

let beep = (notes) => {
    let n = notes[0]; // Current frequency/duration pair
    osc.frequency.setValueAtTime(n[0], ac.currentTime);
    gain.gain.value = 0.04;

    setTimeout(_=> {
        gain.gain.value = 0;
        osc.frequency.value = 0; // Helps prevent clipping

        if(notes.length > 1) {
            beep(notes.slice(1)); // Making the most of JS APIs!
        }
    }, n[1]+5); // Add a small offset to the duration to compensate for
                // Firefox having some trouble with shorter durations.
};
Here’s an example sound, the “Pickup” sound:
let sndPickup = [[523,30],[466,30],[311,30],[261,30],[523,30],[1047,30]];
I created these sounds by ear using a note frequency chart and rounding the figures to the nearest integer. It worked out pretty OK, and the sounds are somewhat reminiscent of early DOS and arcade games.
The Save System
This is another feature that I didn’t think I would be able to add, but after looking into it, was actually really straightforward.
I opted to use the sessionStorage API as opposed to the localStorage API since access control to the former is less restricted. This means that the game retains your progress so long as you have the tab open. Reloading, even hard-reloading, will keep your save data intact. To start a new game you’d have to close the tab and reopen it.
One little bug I ran into while working with sessionStorage is that the getItem method always returns a string, no matter what you stored to begin with, and I wasn’t taking that into account.
I eventually went back over my code and, for every instance I was using it, coerced the returned value into a number like so:
~~retrieve('px')
That retrieve function was an attempt on my part to reduce the byte footprint of the sessionStorage calls. The compiler can’t minify the names of global API objects or their methods, so I tried to delegate.
The compiler ‘helpfully’ optimized my delegation out, replacing each instance of retrieve and its counterpart store with the full-length sessionStorage.getItem and sessionStorage.setItem. Before submitting I manually re-added the delegate functions and did a search/replace over the minified code to save some space.
On death, the last save is ‘loaded’ by reloading the window, which makes for a nice and neat reinitialization of the global state. The reload is achieved with this odd assignment:
window.location = window.location;
Player Progression
When I began work on the spritesheet, I started off really simple. Initially I was going to limit sprites to one color to keep with the Hero Core inspiration, but with a more ZX Spectrum style. Then I started listening to some music and before I knew it I had revised the spritesheet with a much higher per-sprite color count. It definitely made the sprites more vibrant!
That was when I started adding door sprites, different weapons and different suit colors, and basically the game I was planning turned into a micro-Metroidvania!
For the majority of the project’s development I wasn’t sure I’d be able to fit any of the desired features in, so I left the bulk of them alone until after I implemented what I saw as the game’s “heart”, those being the boss encounters.
There are still quite a few potential objects and obstacles left out of the final competition version of the game:
- Electric barriers, meant to be brought down by fighting a mini-boss (Similarly to Hero Core)
- Switches that could open doors in other rooms, perhaps with a time limit
- Switchable weapons and ammo for each weapon
- Touch-screen dpad icons (I did implement that, but it was a bit of a big feature so I cut it for space reasons)
- “Crystals” that were supposed to be in the rooms after a boss. You’d destroy them to open the shell around the reactor in the center of the game world.
- Spikes! Not of the instant-death variety, but damaging with a bit of knockback.
- Magma! Originally intended for the lower-right corner of the map.
- Crusher traps! These would come down from the ceiling or up from the floor and cause major damage if the player got caught between them.
- Quick Man lasers! Not instant-death though, but I ended up recycling the art for the fourth boss.
I might implement some of these if I get around to implementing a “Version 1.1” of the game.
Once I was done with them, I added in the ‘bonus’ features I really wanted: barrier doors, optional health upgrades, suit upgrades and enemy variety.
Player Weapons
At the start of the game the intent was for the player to only have four weapons. The pea-shooter, laser rifle, plasma cannon and rocket launcher, in that order.
Earlier in the boss implementation section I mentioned that the bosses originally granted a weapon upgrade when defeated. During testing I often set my weapon level to 3 so I could burst down phases I’d already tested, but this had the side-effect of crashing the game when the level raised to 4 after defeating the boss!
So my quick-n-dirty solution was to add a special ‘5th’ weapon that you get after defeating the final boss, which is a simple reuse of the plasma explosion effect. A “hyper beam”, basically. Completely useless by that point in the game, but satisfying to obtain!
Barrier Doors
This one was a no-brainer to me. I had (initially) four weapons, and I thought that it’d be nice to have a barrier for each type.
Implementation-wise these are basically just in-world collision checks that stop the player from moving through them and will explode on contact with the right level of projectile.
Placement of these was a little tricky - I only had 16 colors to work with on the map, and I was quickly running out. So I pulled a bit of modulo trickery that essentially boils down to this:
spawnDoor(cx*8,cy*8,cx%4);
Where the third argument is the ‘type’ of door, and the variables cx and cy are the tile coordinates of the door.
This did mean that placement was a little bit tricky, but it worked out in the end: I only had to use one map color to place the doors!
Health Upgrades
This was a bit of a no-brainer. I originally started out designing the game around a maximum of 6 health, but then as I started adding in enemies and more complicated bosses I found that the friends helping me test the game were having quite a bit of trouble.
Each health upgrade adds two to the player’s maximum health, and persists for the current game session. There are a total of four to find, and getting them all makes the game significantly easier.
Armor Upgrades
For those who like to 100% things, and for those still having trouble with some of the bosses, I added in armor upgrades at the last moment. At first these were going to be traversal enablers. For example, you’d be unable to enter water without the first tier of upgrade, and the fire zone would damage you until you got the second one.
I scrapped that concept relatively quickly, since there were already barriers in the game.
I later decided to use the assets, but made them behave as a damage modifier: Each upgrade reduces damage taken by 25%, for a total of 50% damage reduction if you collect both upgrades. This also makes the game a lot easier, but they’re satisfying to collect.
Enemy Variety
During almost 90% of the project’s development I only had two types of static turret enemy. One would shoot straight ahead from whatever surface it was spawned on, the other would shoot diagonally in the direction of the player.
After I’d populated the game’s map a bit, this felt really bland. I was at the 12k mark already when I hit this point, but I managed to squeeze some really simple extra enemy behaviors in at the last minute - a “rover” enemy that moved left/right or up/down between walls, a static enemy that burst into a ring of projectiles when destroyed and a special turret that shoots tracking projectiles.
Even this handful of extra enemy types adds a lot more variety to the game’s areas, and given the way the respawn feature works, you can sometimes reroll into some really challenging rooms!
Ending and Escape Sequence
The final sequence of the game was a really late addition. I didn’t think I’d have space for anything too fancy (And I was mostly right), but given that I had a few hundred bytes to spare I decided to add a win screen and an escape sequence.
Originally the escape sequence was going to have a timer, but I found that given the limits to what I could do with regards to making a complex escape route, it wasn’t worth the implementation - instead I chose to create a sense of tension with the screenshake and explosions, so it seems like there’s an urgency to escaping, and so that the end screen feels a bit more rewarding than simply flashing up the second you destroy the reactor.
If I’d had a bit more space to work with (And some more available map colors) I would have liked to have implemented an idea I had fairly early on: Block up some passageways and open up others so the player has to escape through areas they’ve already been through a new route - maybe something for the post competition version?
The Canvas Flip Bug
I had a mild panic a few days before submission when I discovered that, seemingly at random, the canvas was flipping itself upside down. After a bit of digging, I discovered it wasn’t anything to do with the game but was a strange behaviour introduced into a specific version of Chromium that most Chromium based browsers are currently using.
Whenever the tab loses focus (e.g.: The window gets minimized or you switch to another tab and back again), the canvas would flip and remain flipped until reloading.
I confirmed that it wasn’t “just me”, and have been finding it happening on any entry that utilizies the 2D render context (WebGL contexts seem immune to the problem).
A friend of mine who was helping playtest the game just before submission intentionally flipped the canvas and played the game in “Mirror mode”, as he called it. Successfully too, I might add. So I labeled it a ‘buggy feature’ and submitted the game.
Submission
I made a point of making use of the new submission PR bot provided for this year’s competition. It made submission a lot easier, and pointed out a really dumb mistake I’d made (Forgot to rename index1.html in the distributed zip to index.html!).
I actually submitted my game nearly a full week before the deadline: I’d basically run out of space and had actually accomplished my design goals for once - I’m used to overscoping and cutting features like crazy before submitting!
That said, after submission I encountered two unexpected bugs! Let’s go over them.
Bug #1 - Monitor Sync Rate
requestAnimationFrame is a pretty handy browser function. And I’d always (naively) assumed it was going to try to give me a constant ‘animation’ tick, that tick being roughly every 16ms or so. 60 frames per second.
And I had no reason to believe otherwise! It works like that on all my devices! So I treated updates as fixed-increment and used fixed values everywhere - a very bad idea, as it always is, because when a friend of mine tried it on his 120hz monitor, the game predictably ran twice as fast!
I quickly implemented a traditional fixed timestep, which only took about seven lines of code total, and submitted a patch to the competition organizers.
For those interested, my implementation of the timestep (Patched together after a hasty reading-up of a bunch of articles and StackOverflow answers) looks like this:
// globals:
let frameStart = 0, frameDelta = 0, FPS = 60, frameTime = 1000/FPS;

// At top of update function:
let main = () => {
    let time = window.performance.now();
    let delta = time - frameStart;
    if(delta > 1000) delta = frameTime; // To 'skip' frames if we accumulate too much frame time
    frameDelta += delta;

    while(frameDelta > frameTime) {
        // Do Update Code here
        frameDelta -= frameTime;
    }

    frameStart = time;
    requestAnimationFrame(main)
}
Note that this is a fixed timestep, as opposed to the variable timestep used in a lot of 3D engines (In those you tend to scale your movement by the delta time). This gives me the expected 60FPS if it’s achievable on the current hardware, and means I can get away with not having to touch my movement code.
Bug #2 - Color Profiles
Credit to sirxemic for finding this one and contacting me with a fix. You should go try out his entry to the competition, SenTetrox, which is best described as Tetris with a really fun twist! Go give it a play!
This bug is a little bit more obscure, but it’s related to how I’m generating my map: I’m reading in pixels from my spritesheet and comparing them against exact RGB values in an array.
What I failed to take into account was the color profile of the player’s monitor. If an image has no attached color profile, the browser will convert it on the fly to the user’s color profile, using what I’m assuming is a perceptive conversion - this means that while the colors will appear to look the same or similar-enough, the exact RGB values are different.
I use Aseprite for all of my pixel art, and in this case in particular I was working with indexed PNG images. Because I hadn’t set my defaults up for sRGB, it saved the images without a color profile!
The game still worked on the majority of systems, but for anybody using a monitor with a different color profile, the game would be unable to load, as the map pixels wouldn’t match any of the palette-data.
This was a simple fix, as I just opened the spritesheet in Krita and converted to the sRGB color profile while choosing to use absolute mode instead of perceptive mode. Simple, but it stands as a good example of bugs that can easily fly under the radar.
Summary
I’ll sum things up here in the traditional postmortem format, to round things off!
What Went Right
Having a clear idea of what I was making meant I knew exactly what I needed to do at each step to get to the core of the game I wanted.
That idea was informed heavily by my decision to create an asset sheet before starting. I gave myself a palette of sprites to work with, and the game formed up from there.
The timing of things worked out pretty well, since I was able to spend a good 1-2 hours every day on the game - this isn’t always the case as I never know when I may or may not have extra work on my plate. Being able to finish the game in three weeks instead of four gave me some extra breathing room for bug testing and polish.
What Went Wrong
Surprisingly little this year! My last two js13k games were, to be honest, hardly games - they were experiments, and I think I did a good job learning from them this year.
If anything, my biggest failure this year was not spending the time setting up a more streamlined build process. I did a lot of manual compilation, compressing and size-checking throughout the competition.
What I’ll Do Next
Generally I have a bad track-record when it comes to doing post-jam/post-competition work on my games, but given the “completeness” of this one, I feel it’d only be right to make an attempt at a tidied up post-jam version with a few extras and tweaks. I’ll be attempting that if time permits after the voting period (There’s a load of games to get through, and some of them are time consuming!)
I’d like to work on a “Super” Xycore, something a bit more complex and not limited to weird infrastructural choices born of limitations, and with a wider selection of art, sounds and music - and if work doesn’t get too busy, I’ll probably get somewhere with that.
For next year’s JS13k I’m hoping to prepare a common library of tools in advance, as well as an automated build system to streamline the process - and maybe I’ll revive my original idea? Who knows!
For now, I’m going to be playing the other entries! I’ve played around 60 so far and there are some real standout games this year - I’m looking forward to seeing what else lies in store!
△Back To Top
Comments
comments powered by Disqus